


What You Will Need
Banknotes
Obviously
A pencil
To mark where the photo corners / mounting strips and mounting cards need to go on each page
An eraser
In case you change your mind about where to place the photo corners, strips or mounting cards.
Also useful for removing any mistakes that you might make.
A clear ruler
Allows you to see what is underneath when you are measuring.
Also useful for keeping your photo corners and mounting cards lined up neatly.
Give the ruler a wipe with a damp cloth before using it, in case there is any ink that might smudge on to your pages or banknotes.
Photo corners or Mounting strips
Banknotes are usually mounted using photo corners or mounting strips.
Photo corners come in a range of sizes and colours – use clear ones so that you do not cover the corners of your banknotes.
Mounting strips also come in a range of sizes. Strips can be trimmed to suit individual items.
There are other ways of mounting banknotes, such as plastic pockets.
Pockets tend to reflect the light in the room, making it difficult to see the details on the notes. But if you have a rather fragile banknote, then a pocket might be an option for that note – to protect it.
Adhesive
Glue, mounting squares or adhesive tape, to stick the mounting card to the exhibit pages.
Printing paper
Standard paper of 80 gsm is not stiff enough and is likely to curl up in the frame. Use heavier paper of at least 120 gsm; 160 gsm is even better.
Heavier paper costs a little more, but your display is worth the extra expense.
Make sure that your printer is capable of taking the heavier paper – most printers can.
Mounting card
Mounting card is optional but it shows off your notes nicely and will make it easier for you to reposition your banknotes on each page.
Some people use one particular colour to emphasis that an item is special or rare. But don’t overdo the use of colour – you are not creating a rainbow!
A cutting tool
Scissors or a paper cutter.
If you decide to use mounting strips &/or mounting card, then you will need something to cut the strips/card to the right size.
A paper cutter is better than scissors, because the cut lines will be nice and straight.
A protective cover for each display sheet
There are various types of protective covers.
You can use ordinary A4 protector sheets, but special acid-free protectors are available from the APF Store (see the Links & Downloads page), good stationery suppliers, or stamp, coin and banknote dealers.
A clean, dry working area
Ideally, your working area should be big enough for you to set out several pages so you can see what your display looks like. A dining room table is useful.
Computer for preparing your display
Some people hand write their displays. You need to have very neat hand writing to do this, otherwise it might look untidy or be difficult to read.
Using a computer allows you to change things easily, without the need for an eraser, liquid paper or another piece of paper.
Time and patience
Creating a display of any kind takes time and patience. So don’t leave it to the last minute!
About Display Frames
Display frames contain rows of plastic channels, which are open at the top and bottom to hold the exhibit pages in place.
The standard space between each row in a display frame is actually about 1.5cm SHORTER than a standard A4 page. So set your page margins to be 2cm at the top and bottom of each page.
About Paper Types
You can buy paper that is the right height for display frames. It comes in different weights and widths. Check whether your paper is wider than standard A4 paper. If it is wider, make sure that it will fit into your printer.
You will also need to set your computer and printer for the height and width of your pages. The page size is usually written on the package that the paper is sold in.
If you use the shorter pages, you will still need a 2cm bottom margin, but you can make your top margin smaller – say 1 or 1.5cm.
About Photo Corners
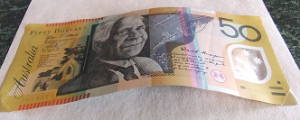
The corner of a banknote will sit inside a photo corner, but you need to allow a little space to prevent your banknote from buckling inside the photo corners.
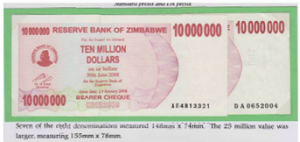
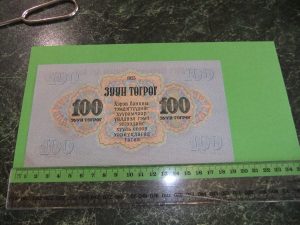
If a banknote measures 200mm across, then the outer edges of two photo corners will need to be about 202 to 204 mm apart.
The image of the $50 below shows what happens if you place the photo corners too close together.
About Mounting Card
Card suitable for mounting banknotes comes in a lot of different colours, weights and sizes.
Choose a card colour that suits all of your notes – and make sure that you have enough card. You can use more than one colour if you like. For example, a different colour for each year.
Check the colour on each side of the card because it is not always the same shade on both sides. If the card is a different shade on one side, then make sure that you always use the same side of the card.
Mounting Options
Banknotes can be mounted straight on to your display pages.
But using card makes them easier to reposition and shows off your notes nicely. Also, if you want to change your display page, you won’t have to remount the notes.
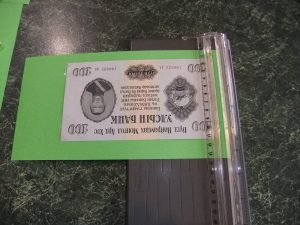
The top note in the image below is not mounted to the page; it is just sitting there to show you the difference.
You can mount more than one banknote to the same piece of card, which can look effective. You need to consider what will work best for YOUR display.
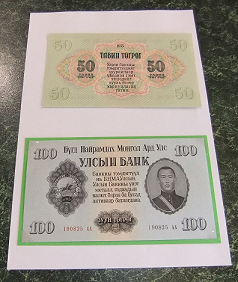
The image below is a page from another display showing two notes mounted together on one card. The text at the top of the page is about BOTH of the notes because there was not enough space on the page to have two lots of text.
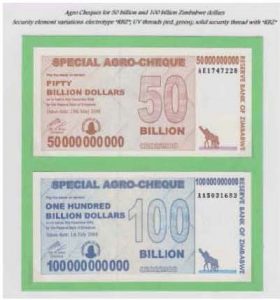
You can overlap two or more notes.
In the image below, there are four photo corners for the note underneath and three for the other note. Two corners of the mounting card have been trimmed just to look nice.
What NOT To Do
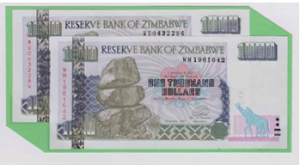
The image below shows what is NOT a good way to overlap notes.
The note on top is only held in place with two photo corners on the left and a plastic strip on the bottom. The top note fell out when someone was putting the display page into a frame.
Font Types and Sizes
Whether you hand write your display or prepare it on a computer, make sure that the text is large enough to read. For a computer, 11 points would be the minimum size for most fonts. Not too large though, or you will not be able to fit in much text on your pages.
Also choose a font that is easy to read. Fancy fonts might look nice, but some can be hard to read.
Rules and Regulations
Most exhibitions have rules and regulations – usually in a document called a Prospectus.
Make sure that you read the rules and regulations BEFORE you start making your display.
Plagiarism
Information for your display can be obtained from various sources: a journal, a catalogue, a website, …
When you use someone else’s information, you need to mention where that information came from – that is, provide references.
If you do not provide references, then you are basically stealing someone else’s work. This is known as plagiarism, which is illegal.
Plagiarism can also result in your display being penalised (the judges deduct points from your final score) or banned from being exhibited.
Choosing Your Topic
How much space will you have for your display?
Will it be shown in a frame or a case?
Choosing a topic partly depends on what notes you have in your collection and how much space you will have to show them.
Before you start making your display, you need to know how much space you will have.
Normally, frames are used for banknote displays and cases are used for coin displays. But sometimes people use cases for banknote displays.
Cases hold about eight pages. Most frames hold four rows of four pages, so sixteen pages per frame.
Once you know how much space you will have, you can decide on a topic.
What are the topics that interest you?
What items do you already have in your collection that can be used?
Do you have enough quantity and range of banknotes to cover your chosen topic?
Do you have enough banknotes to cover the topic?
Do you have TOO MANY banknotes to cover the topic?
If you were making a display about hyperinflation in Zimbabwe, you would have more than 80 banknotes to fill your display. The topic could easily fill three or more frames.
But if you have only one or two frames for your display, then you would not be able to tell the WHOLE story. So maybe you could focus on one part of the story – perhaps the banknotes from one particular printing.
How To Make Your Display
If your display will cover more than one frame, work on one frame at a time to start with.
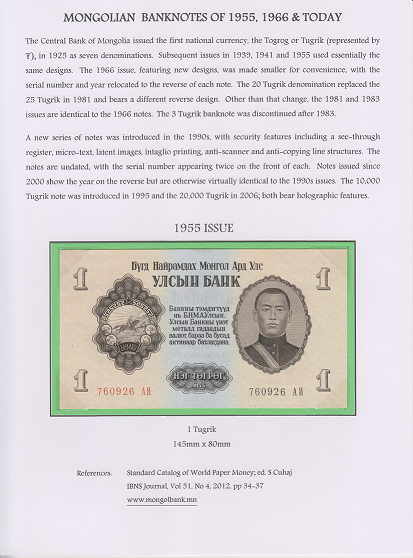
The following steps were taken to make a one frame display (sixteen pages) about Mongolian banknotes.
You can view the finished display on the Displays page.
Step One – Blank Pages
Set out sixteen blank pages on the table, in four rows of four.
Step Two – Experiment with Layouts
Try various ways of setting out the banknotes on the pages.
In our collection there was a full set of notes printed for 1955 and for 1966, plus one of each note printed since the year 2000.
There were only a few notes in the collection from the 1970s, 1980s and 1990s, so they were put aside. It is difficult to tell your story if you do not have enough of the items.
Remember to leave enough space on every page to add information about the banknotes.
Leave the first page empty for an introduction about your display. The introduction is normally written last – because then you will have a better idea of what to write.
Step Three – Key Features
The next step is to look at both sides of every note and make a list of key features.
Look for things that appear on most or all of the notes, whether for one particular year or every year.
Are there any notes that stand out from the rest?
Step Four – Scanning
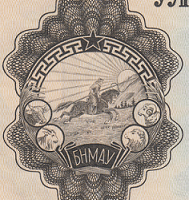
Many of the banknotes from each year shared the same or similar reverse design. There were ten different designs in total. There was not much display space remaining, so it was decided to show just one example of each reverse design.
One of each type of reverse was scanned at 600 dots per inch (dpi). 600 dpi gives a nice clear image without being too big a file size.
You might prefer to use a digital camera instead of a scanner. Remember to keep your file sizes in mind.
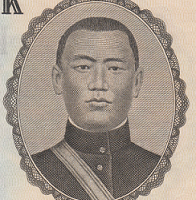
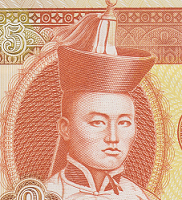
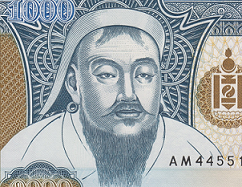
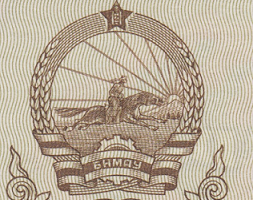
Most of the notes had a portrait of a man on the front. There were three different portraits in total.
There were also three different symbols that appeared on the various notes.
While scanning the ten different reverse designs, the three portraits and three symbols were also scanned.
Step Five – Research
The next step is to do some research about the banknotes.
The research for this display came from a banknote catalogue, an article found in a journal and the internet.
Be careful when using information from the internet. It is not always up to date and not always accurate.
The website for the Central Bank of Mongolia provided some useful information that was not in the catalogue or journal article.
The research provided information about the size of each note, important features such as security elements, and some historic information about the three people and the three symbols.
Step Six – Banknotes, Text & Images Together
The banknotes and research text need to fit together on the pages.
You cannot make a banknote any smaller than it is, but you do have a choice about how much text to include and where to put it on each page.
So you need to know how much space you will have on each page for your text. To do this, you first need to mount the banknotes on the card.
If you are not going to mount the notes on card, then just place the notes straight on to the pages.
Using Photo Corners
Make two pencil marks one cm from the bottom of the card then line up your ruler against the two marks.
The marks keep the ruler straight and the ruler keeps the photo corners and banknotes straight. Having a straight edge makes it easier to trim the card later.
Hold the ruler steady with one hand and place the banknote against the edge of the ruler. Now make two pencil marks next to the edge of the banknote. Move the banknote away.
Keeping the ruler steady with one hand, hold the photo corner by its top edge at a 45 degree angle to the page. Now place the bottom edge of the photo corner against the edge of the ruler – about a mm left of the pencil mark on the left – now press the photo corner on to the page.
Do the same for the photo corner on the right of the banknote.
Now carefully put the banknote into the two photo corners. You might need to gently bend the note to get it in.
Turn the card around and place the ruler about 1 or 2mm ABOVE the top of the banknote – this allows space to prevent buckling.
Make two pencil marks next to the left and right edges of the top of the banknote, then move the banknote away (take it out of the photo corners). Place the remaining two photo corners then carefully fit the banknote into the four corners.
You can use three photo corners instead of four – two for the bottom and one for the top. But two photo corners are not enough; your note is liable to slide out and ruin the look of your display (or get damaged).
One of the banknotes in the Mongolian display was a bit soft, so larger photo corners were used for that one – to hold it better. We could have used a mounting strip instead.
Using photo corners takes a little practice. If you accidentally stick a photo corner to your banknote, you will not be able to remove it without damaging the note. So practice with ordinary banknotes from your wallet or purse.
Using Mounting Strips
You only need one mounting strip for each banknote.
But you still need to line up each strip on the mounting card (or on the final printed page). A clear ruler and some pencil marks will help you to position the strips neatly.
Step Seven – Trim the Card
Now you need to trim the edges of the card an even distance on each side of the banknote.
You need to have the banknote in the photo corners so that you know where to trim. So when you do the trimming, take your time and be careful – you don’t want to cut off the edge of your banknote.
Practice with ordinary banknotes first.
Step Eight – Create a Document
After mounting all of your banknotes, the next step is to create a document for your display. The Mongolian display was created using Microsoft Word, but you can use any suitable program.
Set the margins on your pages to be 2cm each at the top and bottom (and 1.5cm or 2cm on the left and right).
The top margin is enough space that you will not trim off the first row of text on each page and the text will not be hidden by the mounting channel on the display frame.
The bottom margin will guide you to not print or mount anything in that space, which could be covered or even damaged by the mounting channel.
The standard space between each row in a display frame is actually about 1.5cm SHORTER than a standard A4 page. So when you finish making your display, cut 1.5cm off the TOP of each page to make them fit in the frame rows.
Trim the pages AFTER you print them out, otherwise your printer might print the text and images in the wrong place on the pages.
Step Nine – Scanned Images
After setting the margins, copy the scanned images on to the blank pages.
It is common practice that scanned images in a display are usually smaller than actual size. They don’t have to be smaller – you can make the images bigger if you prefer.
For the Mongolian display, the two 1955 reverse images were put on one page and the three 1966 reverse images were put on another page.
For the modern issue notes (since year 2000), one of the reverse designs appeared on just one note, so that scanned image was placed on a page next to where the actual banknote would go.
The other four modern issue scans were put together on another page. The three portraits went together on one page and the three symbols on another page.
Don’t be too concerned about where to put each of the images at this stage, because you can move them around once all of them have been copied to your pages.
The image below shows an early draft of the page with the reverse image that only appeared on one banknote.

Step Ten – Text Boxes (Optional)
You don’t have to use text boxes, but they make it easier to fit the text, notes and scanned images on each page.
Measure the mounting card for each note and make a text box that size on the page where the mounted note will go.
Now make some text boxes for the research information.
For the Mongolian display, the borders were removed from the boxes that would contain text because it looked neater that way. The boxes are still there – you just cannot see them.
The borders on the boxes for the notes were made bold, so they would frame the mounted cards inside them. But those box borders could also have been made invisible.
Remember: if you delete a text box, that will also delete the text inside it plus change the layout of your page.
Step Eleven – Research Text
Type your research information into each of the text boxes, resizing and moving the boxes to fit the text and to fit on each page.
Any information common to more than one banknote does not need to be written next to EVERY note. That would be needless repetition, taking up valuable space – and maybe a bit boring to read. So that sort of information can be mentioned somewhere else in your display.
In the image below, the page on the left shows the three scanned images for 1966. The text is about the three 1966 reverse designs and on which note each design appears.
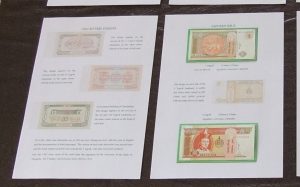
The paragraph at the bottom tells about other features common to all of the notes in the 1966 series, such as the fact that none of them are signed.
So, common information has been grouped together on one page.
About Research Text
There are some things that you usually DON’T need to tell the reader – such as the colours on the notes – because they can see that for themselves. Unless there is something special or important about the colours.
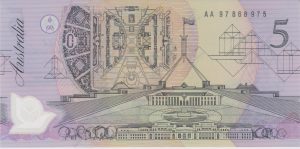
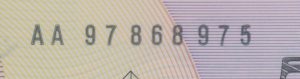
If you were going to put the two $5 notes below into a display, you might want to mention that the top note has a dark green serial number and the bottom note has a light green serial number.
From your research, you would know that the colour of the serial numbers on these particular notes IS important.

Step Twelve – Headings
Put a heading on each of your pages.
By now you should have a good idea of what each page will show, which should help you decide on suitable headings.
Try to keep your headings short – usually no more than one line of text.
Headings tell the reader what each page is about. You can use the same heading on more than one page, if the pages are about the same part of your topic.
Step Thirteen – Resize and Move for Layout
After adding the headings and creating each of the text boxes, experiment with moving and resizing the text boxes and scanned images to make things fit nicely on each page.
You might need to reword or reduce some of your text – think about what are the most important things to tell your readers.
Step Fourteen – Introduction
Writing the introduction is one of the LAST things that you do. When making a display, you might start out thinking that you are going to do it a certain way – but end up doing it differently.
Your introduction needs to reflect what you HAVE done with your display; not what you THINK you are going to do. So if you write your introduction first, you will probably need to change it later.
You can also use page one to provide any general information that is not written elsewhere in your display.
For the Mongolian display, information was obtained from a journal, a catalogue and a website. So, at the bottom of page one are the references used to make the Mongolian display.
Step Fifteen – Draft Print
Print out all of your pages.
Use ordinary paper to start with, because you will need to change and reprint some pages several times before you are happy with the look of your display.
Once you have fine tuned the layout of the display, you can print it out on to the heavier paper. Check each page as it is printed.
Step Sixteen – Mount the Cards
Each of the green mounting cards was stuck in their place on the pages. We used glue, but you can use photo corners, mounting squares or adhesive tape if you prefer.
If you use adhesive tape, put it UNDER the card so that it does not show in your display.
Step Seventeen – Trim the Pages
Now trim 1.5 cm off the TOP of every page. This will ensure that the pages fit into the rows of the display frame.
Step Eighteen – Stickers and Protector Sheets
Print your name on some stickers and number the stickers one to sixteen.
(For exhibits of more than one frame, number subsequent sheets onwards from seventeen).
Put one sticker on the back of each of your printed display sheets. You can write straight on to the back of the sheets, but that sometimes shows on the other side.
Now put each sheet into a plastic protector. If you are using standard A4 sheet protectors, you might need to trim 1.5cm from the top of each protector.
There are two reasons for not putting your name stickers on the plastic protectors.
One: The stickers might peel off and get stuck to other pages.
Two: You might want to reuse the protectors for other displays.
A printable PDF version of this article is available from the Links & Downloads page.